Monkeyprint DLP slicer update — performance and features
In my last post I mentioned the redesign of Monkeyprint’s slicer code to fix some bugs, namely frequent crashes and high memory usage. The work is done now and it does not only fix the issues but also comes with some nice improvements!
Slicing of intersecting objects
3D artist Vaughan Ling asked me about slicing STL files which contain intersecting objects. This seems to be commonplace in (mesh based) 3D modeling for 3D print and rendering. Of course it is easier to assemble a complex model by “simply” throwing together some objects that overlap than to actually unifying them. A render engine doesn’t care anyways…
However, my slicer code did choke on the intersecting parts. It correctly sliced the multiple parts into a list of polygon contours. But when each of the contours was converted into an actual slice image and the slice images were combined, the overlapping regions were rendered black instead of white.
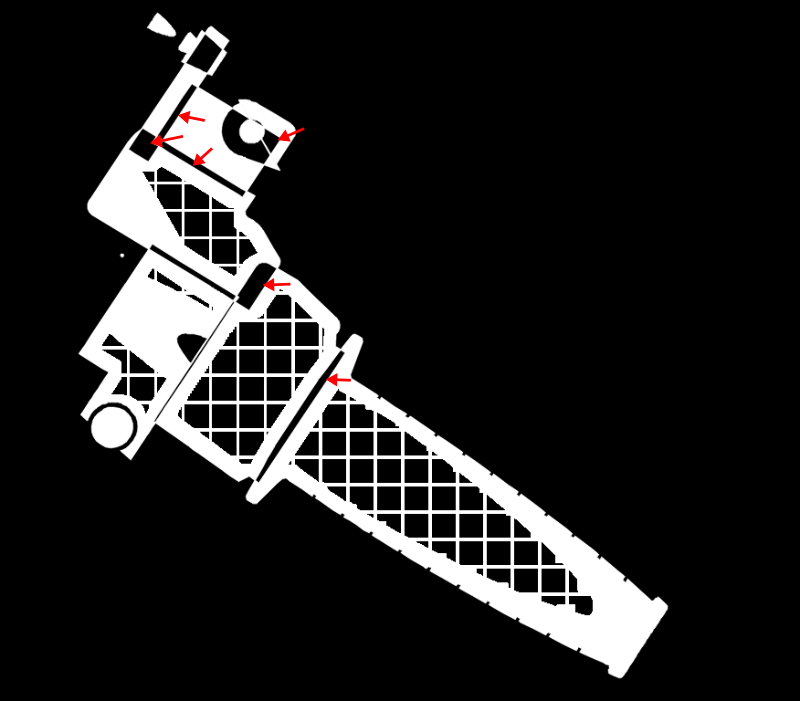
The image above shows an example of intersecting objects from one STL file — it’s the handle of Vaughans hover bike model. Up to this step, the individual contours are created correctly…… but the combination of the contours failed. The regions where individual parts overlapped were black instead of white. This would result in disconnected parts — which is of course not acceptable.
Why did this happen? As the slice contours were created correctly, the issue had to be with the conversion of the 3D slice contours into the 2D black and white slice image. Specifically, the step where slice images from the single objects are merged into one final slice image proved to be tricky. Check out the diagram below…
Slice image creation progress from the 3D objects (red and blue) via the 3d slice contours at a given Z position to the slice images. These start as a black image to which the slice contours are “added” successively. The crucial part seems to be how exactly these contours are combined. As we are talking about binary images here, we can use the terminology of bitwise logical operators to characterize the combination of individual contour images. The old slicer had an XOR behavior which caused overlapping contours to appear black. As a first approach I simply changed the code to do an OR operation between the individual contour images. This got the overlap regions right, but unfortunately also filled the hole of the red object. It became clear that simple XOR or OR operations could not tell nested contours from the same object and overlapping contours from different objects apart. So, as a solution, I had to change the code to keep track of which contour belonged to which object. With this, I was able to do an XOR for contours belonging to the same object — which would create holes for nested contours (red). For contours of different objects I would then do an OR, which also fills overlapping regions.
The new Monkeyprint slicer can now do both: separate and intersecting objects. If you have intersecting objects, simply check the “Multi object slicing” option in the settings dialog 🙂
Slicer speed
Apart from the intersecting object stuff, the major improvement is the slicer speed. As mentioned before, the old slicer took several seconds to generate a single slice in complex models. This is history now! I’ve been able to replace the VTK code that transfers the slice contour polyline into an image by some OpenCV code.
The speed-up is quite noticable. I’ve run some tests using stl files of varying complexity. See the results below.
The test models used for measuring slicer speed. Models iwth intersecting objects are colored. The giro cube has multiple objects too, but they do not intersect. Sources: Giro cube air, Diagrid ring, Eiffel tower, Knocker dragon. Bike handle by Vaughan Ling.
New and old slicer run times in seconds for the different test models. Especially for models with high poly counts the old slicer was quite slow. The new slicer is much faster (about 53% on average) while the new slicer with multi body slicing enabled is even faster for single object models than the new slicer with multi body slicing disabled. This is a bit puzzling, I’ll have to investigate why that is. Base line: the new slicer is awesome 🙂
See you next year
In the end, just a quick animation running through the slices of all models. Always nice to see how good the hollow and fill pattern option works 🙂
Walk through the slices of all test models created by my Monkeyprint 3d DLP printer software.
That’s it for this year. Have a Merry Christmas (if you care about such things) and see you next year!
As always, subscribe for updates and if you like this (or if you don’t), comment below!
Paul
13 thoughts on “Monkeyprint DLP slicer update — performance and features”
Look promising Paul. Congrats. I will try it soon.
Awesome work and writeup. You are thorough! I can’t wait to try this out, the slicing operation looks perfect and it’s the first time I’ve seen something like this (infill, auto merge) on an SLA slicer.
I have 1 suggestion. I know technically this is called multi body slicing, but for the average user the name could be more descriptive of it’s use, like merge intersecting or combine objects. Also would be handy for the checkbox to be placed in the main slicing controls vs in the top menus, I think this is an extremely useful feature!
Also, any word on raspberry pi implementation? I see the greyed out option in settings, is there a way to hook up over wifi?
Vaughan,
thanks for your comment!
You’re right, the name “multi body slicing” might not be the best choice. I’ll change it to one of your suggestions in a next release.
About the check box: I’m still not sure it is needed at all. I placed it in the settings dialog to minimize confusion for users that don’t need it. What about you, do you want to change this setting frequently?
The Raspberry Pi thing is still work in progress. I’m able to send a print job to a Pi via network and run it from there. However, I planned to have the Pi send feedback back to the PC running Monkeyprint constantly to observe the progress. However, I had to fight with some network timeout stuff and will now go for a simpler solution. It will just send the print job and the Pi will have an LCD that shows the progress and a menu to control the printer.
However, that will not be before some month.
Also, I have created a feature request on github for building without supports flat on the build plate. I’ll address this soon I think, I had this implemented somewhere before I think…
Ah you’re right checkbox should probably be hidden, as long as it’s turned on by default.
Excited to hear about the Pi…I’m not sure if you’ve used NanoDLP but they run the pi through a browser so it can run off any phone or tablet. LCD on the Pi would be a nice feature too.
Interesting update, even if i haven´t had that problem in the past. I´m used to design single solid parts in Catia, to get the best result.
One thing i´ve stumble upon in the past are two very nice features:
The first one is a little helper to remove from the build plate by printing a little hinge/lever at the side of one raft. Seems to be working fine for Form2 users.
Second one is a little bit more special: https://www.youtube.com/watch?v=HAmneiL5-jQ
Variable slicing based on the gradual change of build size. As its open source code, may it be possible to implement that?
Interesting features, especially the second one.
It would be great if you could turn these in to feature requests on my github.
Especially the second one needs some discussion I think, which is better placed on github to keep things together.
Seems like more and more feature requests are stacking up, I think it might be time for a poll in my next post to see where to start…
great work!
but it seems that unfortunately there is no further development on that. Maybe (I guess) you`re busy with other things. I`m very sorry because I think your software could be a great piece for all DIY sla printer builders.
I’ve not been working on the project for quite a while indeed, but currently I’ve picked it up again some weeks ago and plan to release a basic windows version until Christmas.
Hi Paul
Today I installed ubuntu on my laptop especially to try monkeyprint
it is great and the user interface is easy to use and the app can do it’s job wonderfully.
I am planing to use this app with my new homemade dlp 3d printer after I finish it and until then maybe I can try the windows version if it is ready.
great work and thanks for sharing with us
best of luck


Look promising Paul. Congrats. I will try it soon.
Hi Paul,
Merry Christmas and a happy new Year!
Bruno
Thanks Bruno,
the same too all of you!
Paul
Awesome work and writeup. You are thorough! I can’t wait to try this out, the slicing operation looks perfect and it’s the first time I’ve seen something like this (infill, auto merge) on an SLA slicer.
I have 1 suggestion. I know technically this is called multi body slicing, but for the average user the name could be more descriptive of it’s use, like merge intersecting or combine objects. Also would be handy for the checkbox to be placed in the main slicing controls vs in the top menus, I think this is an extremely useful feature!
Also, any word on raspberry pi implementation? I see the greyed out option in settings, is there a way to hook up over wifi?
Vaughan,
thanks for your comment!
You’re right, the name “multi body slicing” might not be the best choice. I’ll change it to one of your suggestions in a next release.
About the check box: I’m still not sure it is needed at all. I placed it in the settings dialog to minimize confusion for users that don’t need it. What about you, do you want to change this setting frequently?
The Raspberry Pi thing is still work in progress. I’m able to send a print job to a Pi via network and run it from there. However, I planned to have the Pi send feedback back to the PC running Monkeyprint constantly to observe the progress. However, I had to fight with some network timeout stuff and will now go for a simpler solution. It will just send the print job and the Pi will have an LCD that shows the progress and a menu to control the printer.
However, that will not be before some month.
Also, I have created a feature request on github for building without supports flat on the build plate. I’ll address this soon I think, I had this implemented somewhere before I think…
Best, Paul
Hi Paul,
Ah you’re right checkbox should probably be hidden, as long as it’s turned on by default.
Excited to hear about the Pi…I’m not sure if you’ve used NanoDLP but they run the pi through a browser so it can run off any phone or tablet. LCD on the Pi would be a nice feature too.
Happy new year!
Interesting update, even if i haven´t had that problem in the past. I´m used to design single solid parts in Catia, to get the best result.
One thing i´ve stumble upon in the past are two very nice features:
The first one is a little helper to remove from the build plate by printing a little hinge/lever at the side of one raft. Seems to be working fine for Form2 users.
Second one is a little bit more special: https://www.youtube.com/watch?v=HAmneiL5-jQ
Variable slicing based on the gradual change of build size. As its open source code, may it be possible to implement that?
kind regards
Daniel
Hi Daniel,
a happy new year to you too!
Interesting features, especially the second one.
It would be great if you could turn these in to feature requests on my github.
Especially the second one needs some discussion I think, which is better placed on github to keep things together.
Seems like more and more feature requests are stacking up, I think it might be time for a poll in my next post to see where to start…
Great job Paul…
I am very glad to see how your development is forward well.
Thank you for your help in this technology!
congratulations!!
this project could use their software well. the current software is a disaster. maybe they can help.
https://www.kickstarter.com/projects/249504031/sparkmaker-the-most-affordable-desktop-sla-3d-prin?ref=discovery
Hello Paul,
great work!
but it seems that unfortunately there is no further development on that. Maybe (I guess) you`re busy with other things. I`m very sorry because I think your software could be a great piece for all DIY sla printer builders.
Hi Volker,
I’ve not been working on the project for quite a while indeed, but currently I’ve picked it up again some weeks ago and plan to release a basic windows version until Christmas.
Best,
Paul
Hi Paul
Today I installed ubuntu on my laptop especially to try monkeyprint
it is great and the user interface is easy to use and the app can do it’s job wonderfully.
I am planing to use this app with my new homemade dlp 3d printer after I finish it and until then maybe I can try the windows version if it is ready.
great work and thanks for sharing with us
best of luck